3Dプリンティングが医療で最も確立した用途で、実際の術式が変わった領域である。
腓骨で下顎を作り直す手術は、「まっすぐな骨を、曲がった骨の形に組み直す」という幾何の問題である。
- 下顎再建と手術ガイド
- 手術計画とは何か — 下顎再建の流れ
- 切除ガイドのモデリング — 土台・鋸の案内・固定穴の順に作る
- 腓骨側の計画 — 欠損に合わせて骨片を置き、腓骨にもガイドを作る
下顎再建と手術ガイド
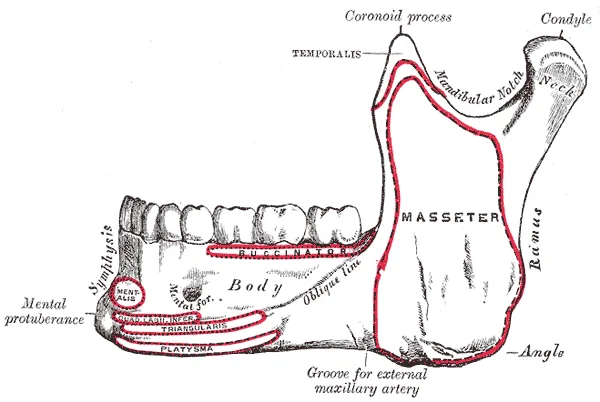
腓骨皮弁(fibula free flap)が下顎再建の標準である。理由は3つ:①長い直線状の骨が採れる(最大 25cm)②血管柄(腓骨動静脈)が長く太い ③皮膚と筋を一緒に持ってこられる ④採取しても歩行への影響が小さい(下腿の荷重は主に脛骨が担う)。
手順:腫瘍のある下顎を切除 → 腓骨を採取 → 楔状に切って(osteotomy)折り曲げ、下顎の弧に合わせる → プレートで固定 → 血管吻合。
ガイドは2種類:切除ガイド(下顎側)——切除線を規定する。採取・切断ガイド(腓骨側)——楔の角度と位置を規定する。
ガイドが解決した問題は「角度の計算」である。従来は術者が術中に目測で腓骨を折り曲げていた。楔の角度を1度間違えると、遠位側で数ミリのずれになる——複数箇所を切ると誤差が累積する。設計時に CAD で角度を決め、物理的なガイドに落とし込めば、術中に判断しなくてよい。
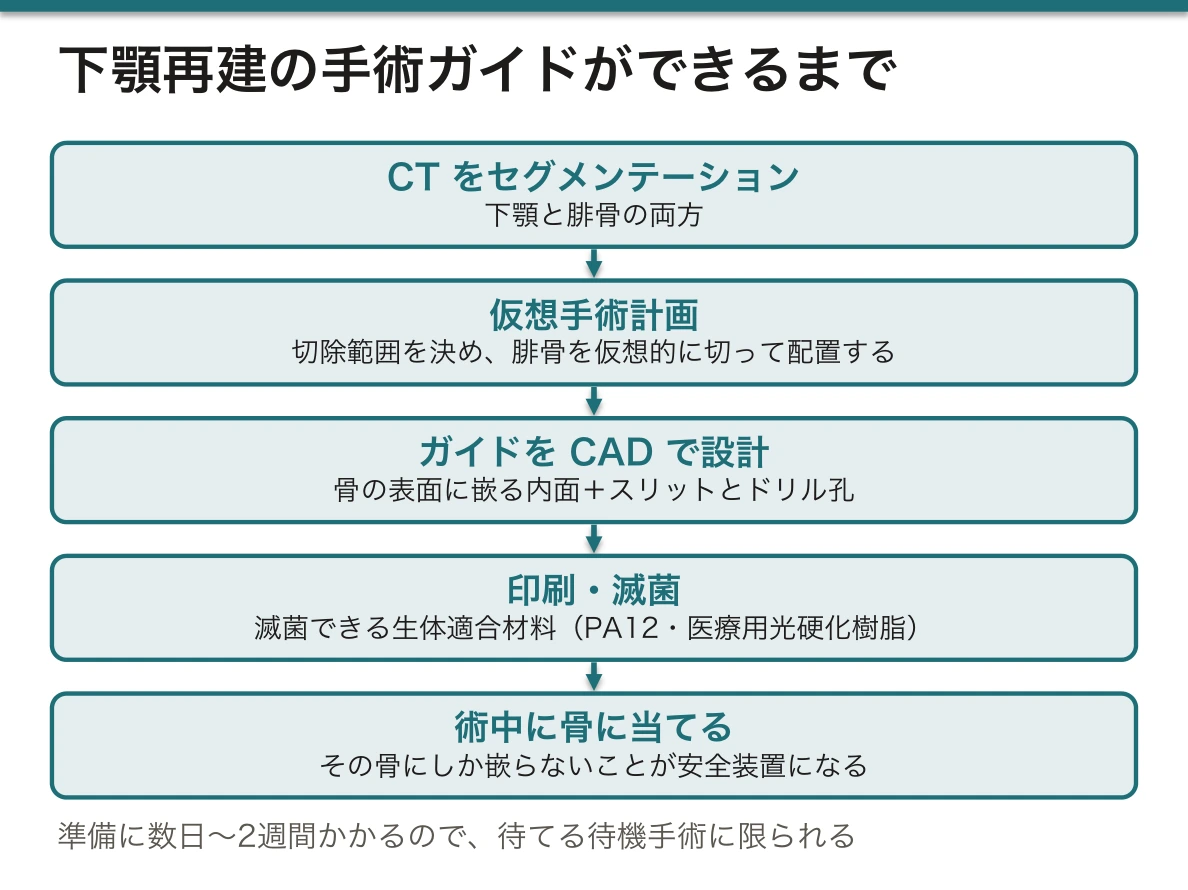
ワークフローはセグメンテーションからモデリングまでの総合である。①患者の CT をセグメンテーション(下顎と腓骨の両方)→ ②仮想手術計画(切除範囲を決め、腓骨を仮想的に切って配置する)→ ③ガイドを CAD で設計(骨の表面形状に嵌る内面+スリットとドリル孔)→ ④印刷・滅菌 → ⑤術中に骨に当てて使う。
ガイドの内面が「その骨にしか嵌らない」ことが安全装置になっている。形が合わなければ位置が違うと分かる。逆に言えば、セグメンテーションが不正確ならガイドは嵌らないか、間違った場所に嵌る——セグメンテーションの検証がここで効いてくる。
報告されている効果:手術時間の短縮、虚血時間の短縮、骨接触面の適合の改善、咬合の再建精度の向上。ただし準備に数日〜2週間かかるので、待てる待機手術に限られる。緊急手術には使えないという制約は、術式選択の判断材料になる。
材料と滅菌:術野で使うので滅菌可能な生体適合材料(PA12・医療用光硬化樹脂)を使い、オートクレーブに耐えるか(PLA は耐えない)を確認する。ガンマ線滅菌・EOG 滅菌が選ばれることもある。
English version
Core
The free fibula flap is the standard for mandibular reconstruction. There are three (four) reasons: ① a long straight bone can be taken (up to 25 cm) ② the pedicle (peroneal artery and veins) is long and large ③ skin and muscle can be brought with it ④ taking it has little effect on walking (the load of the leg is borne chiefly by the tibia).
The procedure: resect the mandible bearing the tumour → harvest the fibula → cut it in wedges (osteotomies) and bend it to the arc of the mandible → fix with a plate → anastomose the vessels.
There are two kinds of guide: the resection guide (on the mandible) — defining the lines of resection. The harvest and cutting guide (on the fibula) — defining the angles and positions of the wedges.
Going further
The problem the guide solved is the calculation of angles. The surgeon used to bend the fibula by eye during the operation. An error of one degree in a wedge becomes millimetres at the distal end — with several cuts the errors accumulate. Decide the angles in CAD at the design stage and embody them in a physical guide, and no judgement need be made during the operation.
The workflow is the sum of everything from segmentation to modelling. ① Segment the patient’s CT (both mandible and fibula) → ② virtual surgical planning (decide the extent of resection, cut and place the fibula virtually) → ③ design the guide in CAD (an inner surface fitting the bone plus slots and drill holes) → ④ print and sterilise → ⑤ apply it to the bone during the operation.
That the inner surface of the guide "fits only that bone" is the safety device. If the shape does not fit, the position is wrong. Put the other way, if the segmentation is inaccurate the guide either will not fit or will fit in the wrong place — the validation of segmentation tells here.
The reported benefits: shorter operating time, shorter ischaemic time, better contact between the bone surfaces, better accuracy of occlusal reconstruction. But preparation takes days to two weeks, so it is limited to elective surgery that can wait. That it cannot be used in an emergency is a factor in choosing the operation.
Material and sterilisation: it is used in the operative field, so a sterilisable biocompatible material (PA12, medical photopolymer) is used, and whether it withstands the autoclave (PLA does not) must be confirmed. Gamma or ethylene oxide sterilisation is sometimes chosen.
手術計画とは何か — 下顎再建の流れ
手術計画とは、CT/MRI と3D技術を使って、手術を術前にデジタルで模擬すること。
できるようになること(4点)——①患者の解剖と病変の位置を把握する ②最適な切除範囲と切離線を決める ③危険を予測する ④器具・ガイド・患者専用インプラントを準備する。
臨床例——下顎に腫瘍があり、切除した部分をインプラントで再建する。
流れ——CBCT を撮る → 下顎をセグメンテーション → 腫瘍の範囲を決める → 切離面(Plane 1 と Plane 2)を定義する → その面で切るための切除ガイドを設計する → ガイドを SLA で印刷 → 滅菌 → 術中に骨に当てて、決めた線どおりに切る。
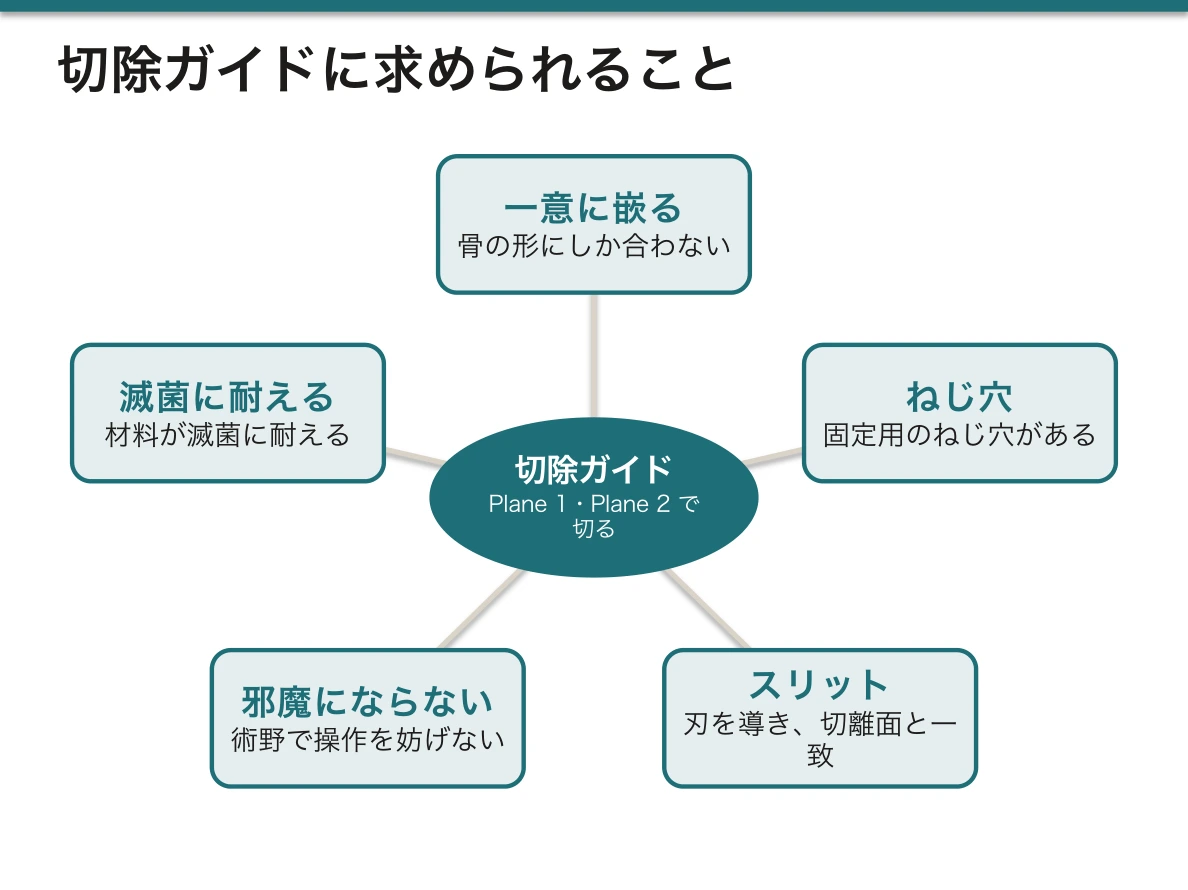
ガイドの要件——骨の形にしか合わない(一意に決まる)、固定用のねじ穴がある、のこぎりの刃を導くスリットが切離面と一致している、術野で邪魔にならない、滅菌に耐える材料。
従来の遊離腓骨皮弁による再建では、腓骨を何度も切って下顎の曲線に合わせる。ガイドがあると切る角度と長さが決まっているので、手術時間が短く、適合が良い。
English version
Core
Surgical planning means simulating the operation digitally before it, using CT/MRI and 3D technology.
What one becomes able to do (four points) — ① grasp the patient’s anatomy and the position of the lesion ② decide the optimal extent and lines of resection ③ anticipate the dangers ④ prepare instruments, guides and patient-specific implants.
The clinical example — a tumour in the mandible, with the resected part reconstructed by an implant.
The sequence — take a CBCT → segment the mandible → decide the extent of the tumour → define the cutting planes (Plane 1 and Plane 2) → design a resection guide for cutting on those planes → print the guide by SLA → sterilise → apply it to the bone during the operation and cut along the lines decided.
The requirements of a guide — it fits only the shape of that bone (its position is uniquely determined), it has holes for fixation screws, the slot guiding the saw blade coincides with the cutting plane, it does not obstruct the operative field, the material withstands sterilisation.
Going further
In conventional reconstruction with a free fibula flap the fibula is cut repeatedly to match the curve of the mandible. With a guide the angles and lengths of the cuts are fixed, so the operation is shorter and the fit better.
切除ガイドのモデリング — 土台・鋸の案内・固定穴の順に作るMandibula
下顎骨 Mandibula(下顎骨)のセグメンテーションと2枚の切除面ができたら、それをモデリング用のソフトへ写し、ガイドを組み立てる。順番は次のとおりである。
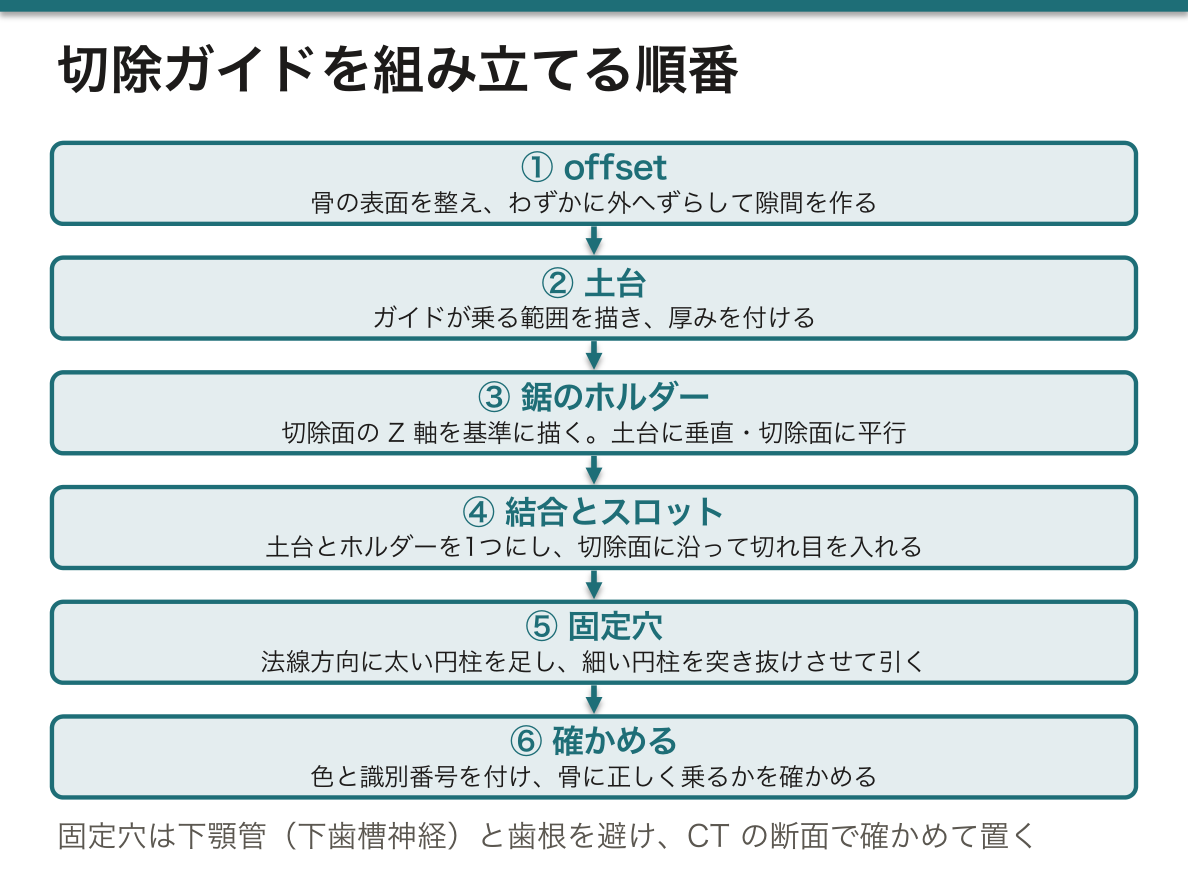
①骨の表面を整え、わずかに外へずらす(offset)。ざらつきを取り、ガイドの内面と骨の間に小さな隙間を作る。②土台の輪郭を描く。骨の表面を筆でなぞるか線を引いて、ガイドが乗る範囲を決める。③土台に厚みを付ける。④鋸のホルダーを作る。切除面の座標系の Z 軸を基準にスケッチを置き、骨と土台との交線を読み込んで輪郭を描き、厚みを付ける。ホルダーは土台に垂直で、切除面に平行になる。⑤土台とホルダーを1つの物体に結合し、⑥切除面に沿って切れ目(スロット)を入れる。
ガイドには2つの型がある。鋸の刃を片側の面だけで支える型と、刃を両側から挟むスロットの型である。後者は内側の穴の輪郭も描く必要があるが、刃の角度がぶれにくい。
⑦固定穴を作る。まず表面の点で法線方向(表面に垂直)に、向きだけを決める見えない円柱(analytical cylinder)を置く。その向きに太い実体の円柱を作ってガイドに足し(ねじの筒になる)、さらにねじの直径と同じ細い円柱を両側へ突き抜ける長さにして引くと、貫通した穴ができる。最後に色と識別番号を付け、セグメンテーションの画面へ戻して骨に正しく乗るかを確かめる。
なぜ offset が要るのか。骨の形そのままに作ると、印刷の誤差や骨の表面に残る軟部組織のぶんだけ、ガイドが浮いたり入らなかったりする。わずかな隙間があれば、ガイドは決まった位置にしっくり乗る。
なぜ細い円柱を突き抜けさせるのか。引き算に使う円柱がガイドの中で終わっていると、穴は途中で止まった袋小路になる。両側にはみ出させておけば必ず貫通する。太い円柱を先に足すのは、穴のまわりに壁の厚みと、ねじを正しい向きに導く筒の長さを確保するためである。
固定穴の位置は解剖で決まる。下顎の中には下顎管 Canalis mandibulae(下顎管)が走り、下歯槽神経 Nervus alveolaris inferior(下歯槽神経)と血管を通している。ねじがここや歯根に入らないよう、CT の断面で確かめて穴を置く。下歯槽神経を傷つけると、下唇とオトガイの感覚が失われる。
English version
Core
Once the mandible (Mandibula) is segmented and the two resection planes are set, copy them into the modelling software and build the guide: ① smooth the bone surface and offset it slightly, leaving a small gap between guide and bone; ② draw the base outline on the bone with a brush or lines; ③ give the base thickness; ④ build the saw holder: place a sketch on the Z axis of the plane’s coordinate system, import the lines where it crosses bone and base, draw the outline and add thickness — the holder is perpendicular to the base and parallel to the plane; ⑤ merge base and holder into one object; ⑥ cut a slot along the plane.
There are two types: one supports the blade on one side; the other is a slot holding it from both sides. The second needs an inner outline too, but keeps the blade angle steadier.
⑦ Fixation holes. At a surface point, place an invisible analytical cylinder along the normal (perpendicular to the surface) to set direction only. Along it, add a thick solid cylinder (a screw sleeve), then subtract a thin cylinder of screw diameter, long enough to stick out on both sides, to make a through-hole. Finally add a colour and an ID number, and paste the guide back into the segmentation software to check that it sits on the bone.
Going further
Why the offset? A guide made exactly to the bone may float or not fit because of print error and soft tissue left on the bone. A small gap lets it sit firmly in one position.
Why extend the thin cylinder through? If the cylinder used for subtraction ends inside the guide, the hole is blind. Sticking out on both sides makes sure it goes through. The thick cylinder is added first to give wall thickness around the hole and a sleeve long enough to guide the screw direction.
In the clinic
Anatomy decides where screws go. The mandibular canal (Canalis mandibulae) runs inside the mandible, carrying the inferior alveolar nerve (Nervus alveolaris inferior) and vessels. Check on CT slices that screws avoid it and the tooth roots. Injury to this nerve causes loss of feeling in the lower lip and chin.
腓骨側の計画 — 欠損に合わせて骨片を置き、腓骨にもガイドを作るFibula
下顎のガイドができたら、計画は腓骨 Fibula(腓骨)側へ移る。
①病変のある骨片を取り除く。切りたい物体(下顎)を選び、次に切る面を選んで、2枚の切除面の間の部分を仮想的に切り落とす。これで再建すべき欠損の形が決まる。②腓骨のモデルを作る。腓骨は別に撮った下腿の CT にあるので、そのデータを開き、下顎と同じ手順(しきい値 → 領域拡張 → 修正)で腓骨を取り出す。③腓骨を欠損に合わせて置く。まっすぐな腓骨を何か所かで切り、骨片を折れ線のように並べて、元の下顎の弧と高さを再現する位置に配置する。④腓骨にもガイドを作る。置いた骨片の切り口が腓骨上のどこに当たるかが決まるので、下顎のときと同じ手順(土台 → 鋸の案内 → 固定穴)で腓骨用の切断ガイドを作る。
なぜ下顎を先に計画するのか。腓骨のどこをどの角度で切るかは、欠損の形が決まらないと決められないからである。計画の順序は手術の順序(切除 → 欠損 → 再建材料を合わせる)をそのままたどっている。
骨片の数を増やせば下顎の弧に近づくが、切るたびに角度の誤差が足され、1つの骨片が短くなりすぎると骨膜からの血流も保ちにくくなる。形の再現と骨の生きやすさの兼ね合いで骨片の数を決めるのが、仮想手術計画の要点である。
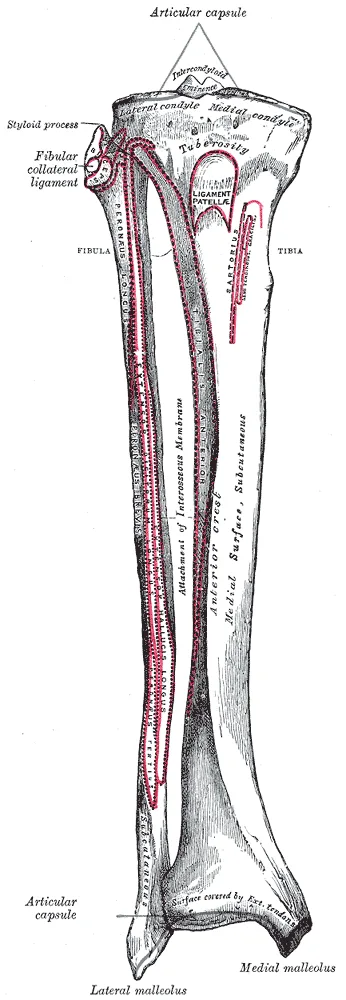
腓骨は全長を使わず、上下の端を残す。上端では総腓骨神経 Nervus fibularis communis(総腓骨神経)が腓骨頸を回っており、ここを傷つけると下垂足になる。下端は外果 Malleolus lateralis(外果)として足関節を外側から支えているので、遠位はおよそ 6 cm 以上残すのが一般的である。腓骨は体重をほとんど担わないので、中央部を採っても歩行は保たれる。血管柄は腓骨動脈 Arteria fibularis(腓骨動脈)とその伴走静脈である。
English version
Core
After the mandibular guides, planning moves to the fibula (Fibula). ① Remove the diseased fragment: select the object (mandible), then the cutting plane, and virtually cut out the part between the two planes. This sets the shape of the defect. ② Model the fibula: it is in a separate CT of the lower leg; open it and segment the fibula with the same steps (threshold → region growing → editing). ③ Place the fibula in the defect: cut the straight fibula in a few places and line up the segments like a bent line to rebuild the arch and height of the mandible. ④ Make a guide for the fibula: now the cut positions on the fibula are known, so build a fibular cutting guide with the same steps (base → saw guide → fixation holes).
Going further
Why plan the mandible first? You cannot decide where and at what angle to cut the fibula until the defect shape is fixed. The planning order follows the surgical order: resection → defect → fit the graft.
More segments follow the curve better, but each cut adds angle error, and very short segments may lose blood supply from the periosteum. Balancing shape and bone survival to choose the number of segments is the core of virtual surgical planning.
In the clinic
The whole fibula is not used; both ends are left. At the top, the common fibular nerve (Nervus fibularis communis) winds around the fibular neck; injury causes foot drop. At the bottom, the lateral malleolus (Malleolus lateralis) supports the ankle from the outside, so about 6 cm or more is usually left distally. The fibula carries little body weight, so walking is kept after the middle part is taken. The pedicle is the fibular artery (Arteria fibularis) and its veins.
まとめ
| 下顎再建と手術ガイド | 腓骨皮弁(fibula free flap)が下顎再建の標準である。 |
|---|---|
| 手術計画とは何か — 下顎再建の流れ | 手術計画とは、CT/MRI と3D技術を使って、手術を術前にデジタルで模擬すること。 |
| 切除ガイドのモデリング — 土台・鋸の案内・固定穴の順に作る | 下顎骨 Mandibula(下顎骨)のセグメンテーションと2枚の切除面ができたら、それをモデリング用のソフトへ写し、ガイドを組み立てる。 |
| 腓骨側の計画 — 欠損に合わせて骨片を置き、腓骨にもガイドを作る | 下顎のガイドができたら、計画は腓骨 Fibula(腓骨)側へ移る。 |
このノートは医学生が授業の内容を自分の言葉でまとめたもので、診療の判断に使うものではありません。誤りに気づいたらお知らせください。